Showing posts with label vanilla buttercream frosting. Show all posts
Wednesday, September 25, 2013
Minnie Mouse Cake
This Minnie Mouse cake is definitely one of my favorite cakes made to date. It was requested by a friend for her daughter's 5th birthday. I have seen this design done plenty of times and I was very excited to finally get the chance to replicate it.
The cake was 2 tiers of chocolate cake with oreos and oreo buttercream filling with a vanilla bean buttercream frosting. All decorations were made with store bought fondant. The ears and the bow were the only 2 things I made in advance. I loved that the details were very simple (a lot of circles) but once the cake was assembled, it made quite the statement.
Sunday, September 8, 2013
Yellow Ombre Cake
This cake actually started out as an attempt at i am baker's rose cake but my roses came out so wonky. So, in the last minute, I just took a spatula to it; turning it into a simple ombre cake instead. The cake was a white cake with lemon zest and lemon extract filled with smashed raspberries and a vanilla buttercream frosting. With the last of the raspberries, I made a heart in the middle but in the end, without creating a border, it just bleed everywhere (pun not intended).
Wednesday, June 19, 2013
Chocolate Mint Cheesecake Cake
A friend's birthday was around the corner and she was looking forward to some mint oreo cheesecakes that I have made previously for a holiday potluck which she loved. Of course, I couldn't just settle with the same dessert. I went with a tried and true method of inserting the mint oreo cheesecake in between two layers of chocolate cake frosted in a vanilla cream cheese buttercream. I have previously used this method with my red velvet cheesecake cake and strawberry cheescake shortcake cake with great results.
To add an additional element of surprise, my future sis in law, over at The Buttercup Baker, helped transfer an image of Justin Timberlake (birthday girl's celebrity crush of all time) onto an edible icing sheet for me. I never worked with it before and I am glad it was really easy to use. I didn't place it right onto the frosting but onto a piece of fondant. I had no issues with the image bleeding despite being in the fridge over night and most of the day.
Wednesday, June 12, 2013
Pink and White Cheetah Print Cake (Cake4Kids.org)
It has been quite awhile since I made a cake for Cake4Kids.org. So, I made sure to sign up this month for one of the cake requests. This request was for a yellow cake with pink and white cheetah print. I don't seem to have the time or patience for fondant nowadays so, I went with my go to yellow cake and frosted and decorated with my go to vanilla buttercream frosting.
The cake did take a bit longer to make as it was 90+ degrees and even at 9pm, it was way too hot to frost a cake. So, it had to go back and forth from the fridge to the counter. Eventually, it set up enough for me to decorate. I could've added more "spots" as I realized it looks more like cow print than cheetah/leopard print now. Hope she enjoyed it regardless.
Saturday, November 10, 2012
SF Giants Cake
For my friend's husband's birthday, I suggested making a cake and she requested a small and simple one, as we would just be having dinner at a restaurant with a few family members and friends. (Last year, I made him an iPad cake.) I made him a 6-inch chocolate cake covered in vanilla buttercream frosting. I brought back a favorite technique of mine for this cake, the buttercream transfer. It was the easiest way to copy the logo of his favorite baseball team onto it. The fun part was that I purposely picked a chocolate cake in order to fill it with an orange frosting to mimic the team's colors on the inside as well.
Wednesday, October 17, 2012
Tiny Toes Theme Baby Shower Cake
It has been an busy start to the Fall season for me. This makes three weekends in a row of baking for me. Remember the friend where I made banana cupcakes for her Bridal Shower and chocolate chip cupcakes for her Bachelorette/Birthday party? Well, this time the sweets are to celebrate her baby shower! The theme was based off of some party supplies named Tiny Toes with a mix of purple and pink as she is having a baby girl.

I made a mini topper cake using Dorie's Perfect Party Cake recipe as my friend wanted a plain white cake. This cake was delicious; I love the hint of lemon in it. However, it was very crumbly when I was cutting it up and serving it. I wonder if it was because I used milk instead of buttermilk.
The cupcakes were made of the yellow cake recipe I stumbled across when baking with my niece a few months ago. Don't you just love it when a cake recipe converts to a cupcake recipe flawlessly? Frosting was a vanilla buttercream frosting; the other half was melted chocolate added to the vanilla buttercream frosting. Of course, I had to use my Nielsen-Massey Pure Tahitian Vanilla Extract again. The toppers were pink and purple marshmallow fondant circles imprinted with the letter L for Lea.
Wednesday, October 10, 2012
Train Theme Cake
Worked on another birthday cake this past weekend. This time I got to make a cake for a boy turning 3. I kept this cake a bit more simple by sticking to buttercream and fondant accents. Also, instead of making Henry the Train out of fondant or whatever, I picked up a toy that he could just keep afterwards.
This cake came together with minimal amounts of hiccups. If you remember, I couldn't wait to go back to this theme since it was last done for a Cake4Kids recipient. I made sure that the train tracks made its way onto the board this time. Also, it was great to have this cake turn out the way I imagined given I also made this boy's first birthday cake. That cake almost broke me when nothing would turn out as planned.
Cake is 6in (2 layers) and 8in (3 layers) tiers of chocolate cake and chocolate frosting. I used Pure Madagascar Vanilla Extract in the frosting for the first time and I am hooked on it now. I wish I had a picture of the inside for you. I have started to use an Ice Cream Scooper to measure out how much frosting I put in between each layer and it looks a lot nicer now.
Wednesday, September 19, 2012
Cocoa Caramel Cake
My niece won first place in the Made By Kids category at the Cake4Kids CakeOff-4Kids event this past weekend! Under my supervision, she baked, frosted, and decorated both a tasting cake and a show cake (which we ended up serving that night as well). They were chocolate cakes with a salted caramel buttercream frosting.
Instead of having her use Hershey's cocoa powder in my go to chocolate cake recipe, I supplied her with a "premium" can of Ghirardelli cocoa powder. It definitely changed this chocolate cake recipe for me. I don't think I can ever go back to every day grocery store brand now. (To make matters worse, I recently purchased both E. Guittard and Scharffen Berger cocoa powders to do a comparison in the near future.)
The best part of the night was when I let her decide whether to use coffee or boiling water with this recipe and she replied with the most logical answer, "Kids don't drink coffee!"
Not wanting her to deal with hot bubbling sugar, I prepared the salted caramel sauce for her which she simply added about 1/2 cup to my go to vanilla buttercream recipe. I was afraid of burning the caramel; so, I took it off the heat a lot sooner than necessary; hence, it didn't turn out as amber. It might explain why the taste was too subtle in the frosting. So, I let her drizzle the caramel sauce all over the top of the cake and it turned out really good! People thought the tasting cake was her show cake as well.
Monday, May 21, 2012
Nyan Cat Cake
This cake for my brother's girlfriend was one of my most fun cakes to make to date. It's based off of the viral YouTube video featuring the Nyan Cat. True to form, I made sure to use a cherry Pop Tart for it's body which I had a friend confirm that it was definitely a cherry pop tart and not any other flavor.
My favorite part was waiting for her to cut open the cake to reveal the rainbow center. I used my go to white cake recipe, divided the batter into six separate bowls, and added a few drops of dye to each bowl. To save myself time, instead of baking six separate layers, especially given I only have 2 8-inch pans, I layered 3 different colors in each pan. I made sure to pour the batter of the top layer (red, orange, yellow) in reverse order because I knew I would flip it over when I stacked/frosted the cake.
This cake definitely brought back a lot of cake methods/tools I haven't used for awhile to save on some time as I have been busy. Come to think of it, I haven't made a decorated cake for quite some time! I used my tylose powder/water glue to hold the fondant to the pop tart. I used the paper towel method to smooth the frosting. I used food color markers to outline the cat for the 8-bit look. I used my clay tool for all the fondant pieces that required even lines.
Saturday, February 11, 2012
All Star Sports Cake
6" and 8" blue velvet cake with vanilla butter cream frosting and fondant accents.
I made this cake for my friend's nephew's sports theme birthday party. Last year, I made him a race car track cake for his hot wheels theme birthday party. In addition to this cake, I made two dozen of the very same oreo cupcakes because they were such a huge hit last year.
Inspiration for this cake came from many of the cakes on Cake Central with the same theme.
Wednesday, November 16, 2011
Blue Velvet Cake
Given I already done an iPad cake this year, I originally wasn't planning to blog about this cake (hence no pictures besides these ones which were off my friend's camera). However, after sitting here eating a slice of leftover cake, I knew I had to share the recipe for this amazing blue velvet cake. It is very similar to my version of the red velvet cake; it's very moist and dense.
I had a lot of bulge the last time I made the iPad cake, so this time, I spent extra time forcing/allowing the cake to settle. After filling the cake, I took a sheet pan and placed it on top of the cake (protected with saran wrap). I stood up on a chair and placed as much weight as I can on the cake. In addition, I left a container of flour and sugar on top of the sheet pan for 30+ minutes while I cleaned up. This allowed me to scrap off the bulge of frosting before proceeding.
Blue Velvet Cake
adapted from Food Network
Makes 1 8-inch round cake
Ingredients:
1 1/2 cups sugar
1/2 pound (2 sticks) butter, at room temperature
2 eggs
1 tablespoon cocoa powder
2 1/2 cups cake flour
1 teaspoon salt
1 cup buttermilk
1/2 tsp blue food gel paste (2 ounces liquid food coloring)
1 teaspoon vanilla extract
1/2 teaspoon baking soda
1 tablespoon vinegar
Directions:
Preheat oven to 350 F degrees. Line and spray 2 8in by 2in round circle pans with parchment paper and baking spray.
Sift together the cocoa powder, flour, and salt into a medium size bowl. Set aside.
Dissolve the food gel paste into the vanilla extract in a small bowl. Set aside.
In a mixing bowl, cream the sugar and butter, mix until light and fluffy. Add the eggs 1 at a time and mix well after each addition. Add the food gel paste/vanilla extract mixture; mix well.
Add flour mixture to the creamed mixture alternately with buttermilk.
In a small bowl, combine baking soda and vinegar and add to mixture; mix well.
Pour batter into pans. Bake for 25 minutes, or until a toothpick inserted into the center comes out clean. Remove from heat and cool completely before frosting.
Monday, October 3, 2011
Teenage Mutant Ninja Turtles Cake
This isn't the fall-esque baked goods I promised; however, it is my brother's birthday today. As a child of the 80s, there was nothing more fitting than making him a TMNT cake. Last year, I knew I wanted to make him the Optimus Prime cake but this year I had no idea how to improve upon that. My sister came up with this great idea, even sketching me the picture to follow. I love that it is very different from the typical TNMT cake. I am partial to believe she just wanted to make cute fondant animals again given she did an awesome job helping with my last cake.
For this cake, I dabbled with isomalt for the first time. We used an empty paper towel roll wrapped in parchment paper. Once the isomalt was ready to work with, we quickly wrapped it around the tube and cut out the paper tube once it set. Then, we cracked it to have all the ooze spilling out. The ooze was simply frosting dyed green.
Because I didn't know how else I would write his name in "teenage mutant ninja turtle" font as my sister suggested, I did a frozen butter cream transfer using a computer print out I did of his name in said font.
Additional cake details - The cake was strawberry cake (a mash up/adaptation of my two favorite white cakes, here and here) with vanilla butter cream frosting, covered and decorated in store bought and homemade fondant.
Wednesday, September 21, 2011
Winter Wonderland Cake
As I mentioned in my previous post, Cake4Kids held their inaugural Cake-Off4Kids Event last Saturday. There were about 50 cakes and 250 volunteers, family, friends, and supporters of Cake4Kids present to help Cake4Kids raise funds for their push to file for non profit status. Even after putting in a lot of behind the scenes work for this event, I knew I wanted to bake a cake for the competition too.
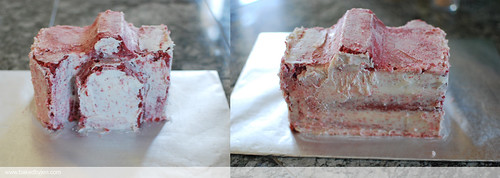
This 6-8-10 tier white cake (from 
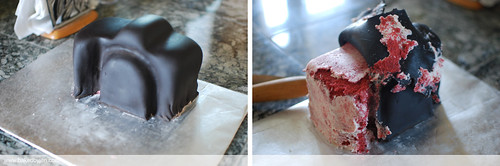
Baking Illustrated) with buttercream frosting covered in marshmallow fondant is my largest/heaviest/tallest cake to date.
The theme was inspired by my love of penguins. I had a lot of help from my sister who made most of the fondant animals while I baked a lot of cake.
I have been using A Better White Scratch Cake recipe from Cake Central for over a year now but the recipe from Baking Illustrated is my new official go to white cake. It was so light and fluffy and moist. It probably isn't ideal for stacking and carving but given the right support, you can apparently stack anything. And, in this case, I was able to carve out a portion of it for a slide. I should've done the cut all the way around but I wasn't sure how it would hold up. Also, I baked the top tier in the Wilton Sports Ball pan instead of carving it for the same reason.
My 8-inch cake pans are actually 8.5 inches in diameter. Hence, when placed on top of the 10-inch tier, there was absolutely no space to place the penguins. Not pictured are three of the penguins which I simply had standing around on the back of the cake instead of my planned snowball fight.
My favorite one, if I had to pick, is the penguin making snow angels! Again, due to lack of space, he had to be on top of the igloo but I think it sort of works.
Taking part in this event, from start to finish, was a lot of fun; the sweetest part was winning the best decorated category!

The theme was inspired by my love of penguins. I had a lot of help from my sister who made most of the fondant animals while I baked a lot of cake.


My favorite one, if I had to pick, is the penguin making snow angels! Again, due to lack of space, he had to be on top of the igloo but I think it sort of works.
Transporting the cake to the location 20 minutes away was nerve wrecking. I have to thank my boyfriend for staying calm and getting us there in one piece.
Taking part in this event, from start to finish, was a lot of fun; the sweetest part was winning the best decorated category!
Sunday, July 10, 2011
Elmo Cake
My nephew celebrated his first birthday over the weekend! Of course, I had to offer to make a cake for the occasion. When my cousin told me he loves Elmo, I was so happy to get the chance to redeem myself as I made one last year for a friend and the cake was a disaster for me.
This turned out exactly as planned, to a point, thankfully. This was a standard white cake with vanilla buttercream frosting. For some crazy reason, I thought royal icing would be a great idea to make Elmo's fur. I should've stuck to buttercream frosting and a #234 pastry tip. Also, when I carved out the shape of Elmo's face/head, because I used an 8-inch square cake, I had these straight sides. So, I fixed that by adding some cake spackle - a mixture of cake and buttercream frosting. After the crumb coat, you can't even tell.
Saturday, July 9, 2011
Batman Cake (Cake4Kids.org)
I finally got a chance to bake another Cake4Kids cake. I don't think I have made one since January! This one was a doctored white cake mix cake with vanilla buttercream frosting. I used a mix of homemade and store bought fondant to cover and decorate the cake. One of my favorite cakes for this organization to date. Simple and sweet.
Sunday, May 1, 2011
SJ Sharks Cake

The birthday girl is a huge SJ Sharks fan, so I went with a simple and clean design focusing on the logo.
The funfetti cake (doctored cake mix) with vanilla buttercream frosting was covered with marshmallow fondant and a braid border was added. The braid was made by twisting two ropes, made with the clay tool, together.
It took me quite awhile to figure out how I would cut and layer the fondant pieces to actually get the SJ Sharks logo to pop. I'm glad I eventually figured it out.
Sunday, April 3, 2011
Tool Box Cake

Finally got back into the kitchen to make another fondant cake. I can't believe an entire month has passed since I made the Nikon Cake. My cousin requested this cake for her husband's birthday. She didn't have any ideas on what she wanted for him; so I suggested a tool box as he is a mechanic and she let me run with it.
I baked four 8x8-inch vanilla cake layers (adapted from Baking Illustrated) and ended up just using 2 and 1/2 cake layers. After I filled the cake with kahlua mousse filling, frosted the cake with vanilla buttercream frosting, and covered the cakes with marshmallow fondant, I realized that it looked a lot like a suitcase. I should've trimmed a bit off from the front! Speaking of the front, I personalized it by replacing where the brand name Craftsman would've been with the recipient's name.
I made the screwdriver with my amazing new tool, the clay extruder; no more uneven ropes! Also, for black and red fondant pieces, I have been staying away from dying my marshmallow fondant and have been using store bought fondant instead but I recently purchased some Americolor Soft Gels Paste and it did not disappoint with how vibrant it made my fondant. Good thing as I'm having better luck working with marshmallow fondant than store bought fondant lately. All the gray pieces was white fondant covered with silver luster dust.
Sunday, February 27, 2011
Frozen Buttercream Transfer

Cake4Kids held a photography class for its volunteers and I offered to make the cake for the event. I used the opportunity to practice a new technique and to use my new pastry scraper. I even piped borders for the first time!
I'm not surprised that the only other all buttercream cake I decorated was a 6-inch lemon chiffon cake I made for Mother's day. Buttercream cakes scare me more than fondant cakes! However, aftermaking this particular cake, I am a little less scared. I love how smooth the pastry scraper got my frosting. I didn't even have to revert to my go to paper towel method.
So, the new technique I got to practice was making a frozen buttercream transfer. I love how simple and clean yet fancy the cake looks because of the added touch!

First, I traced a picture of my dog Patches that my brother created for me onto a piece of parchment paper and taped it onto my cutting board face down.

Then, I traced over the lines using the Wilton Ready To Use Icing Tube in black with a #2 tip.

Next, I filled in the picture accordingly with my go to vanilla buttercream frosting using an angled spatula.

Then, I created an additional white border around the entire image to help make it pop once on the cake.

Last, I covered the entire image with frosting; pressing down slightly to remove any air pockets. I froze the image overnight and the next morning, I placed it onto the cake and the parchment paper peeled right off.
Thursday, February 24, 2011
Nikon D5000 Cake

It has been a little over a year since I made what I thought at the time was my first "show stopping" cake per my sister's request. The cake requests are definitely getting more creative and complex. However, I can't complain as I am definitely learning a lot along the way.
My cousin, a photography hobbyist, celebrated his birthday last week and as a gift to him, I made him a cake replica of his camera per his request. Having a lot of images to go by helps a lot. After looking at several images of the camera online, I realized it was similar to my own Nikon D60. So, I actually used that as a model and then piped on his camera model at the end.

This was my first time carving without a template; so scary! I started with a 2 layer 8-inch square red velvet cake with vanilla buttercream frosting which I cut in half and then proceeded to carve. After sending a quick picture of it to my boyfriend, he commented that it was too small. So, I added another layer to the top and to the side. I also changed the jutting top piece into a trapezoid from a square the second time around.

I used store bought fondant to cover the cake and it was a nightmare to work with that day. I couldn't get it as pliable as I wanted/needed and my first attempt ended with way too wrinkles. So, I ripped it all off and started over. That resulted in losing all my sharp edges but nothing cake spackle couldn't fix.
I realize I don't take any pictures of the lens in the making! It was made of store bought rice krispies treats I smashed together and covered in two layers of fondant to avoid the lumps and bumps. Pearl luster dust mixed with vodka gave the perfect illusion of a glare for the lens.


My two personal favorite details on the cake was sneaking my dog Patches onto the back screen and the personalized camera strap. I love the trim I was able to put onto the strap with my Wilton cutter/embosser wheel. I learned that I need to work on my piping skills; it took me five attempts to just pipe the words Nikon and D5000 onto the cake correctly!
Subscribe to:
Posts (Atom)