Sunday, February 27, 2011

Frozen Buttercream Transfer

frozen buttercream transfer


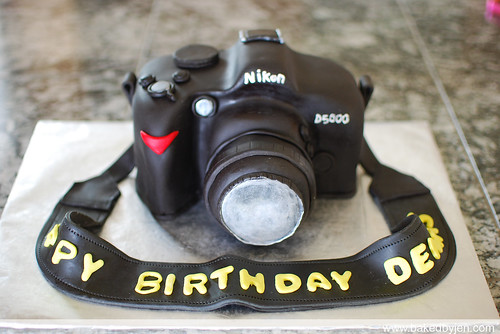
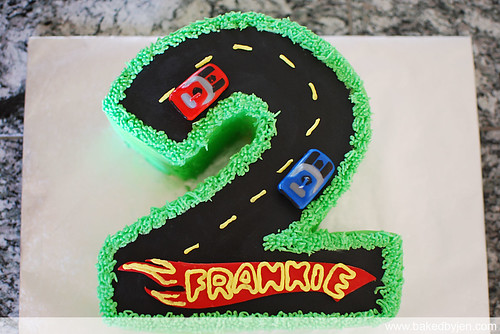
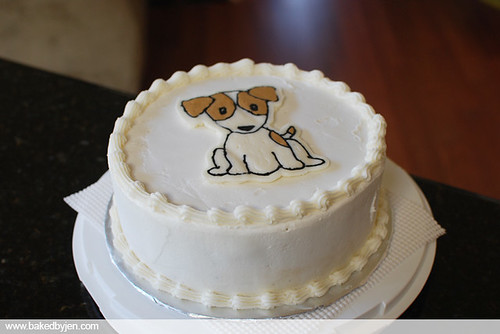
Cake4Kids held a photography class for its volunteers and I offered to make the cake for the event.  I used the opportunity to practice a new technique and to use my new pastry scraper.  I even piped borders for the first time!

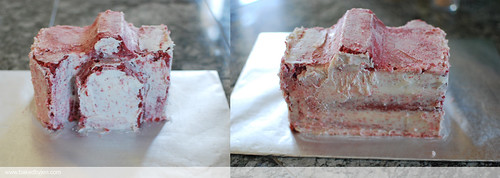
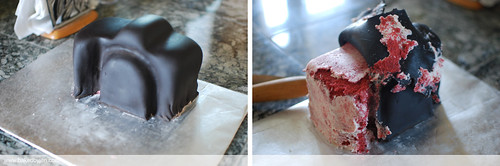
I'm not surprised that the only other all buttercream cake I decorated was a 6-inch lemon chiffon cake I made for Mother's day.  Buttercream cakes scare me more than fondant cakes!  However, aftermaking this particular cake, I am a little less scared.  I love how smooth the pastry scraper got my frosting.  I didn't even have to revert to my go to paper towel method.

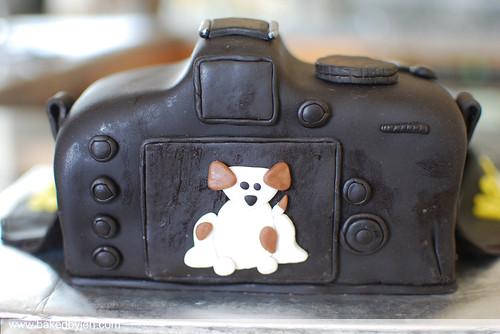
So, the new technique I got to practice was making a frozen buttercream transfer.  I love how simple and clean yet fancy the cake looks because of the added touch!


frozen buttercream transfer step 1
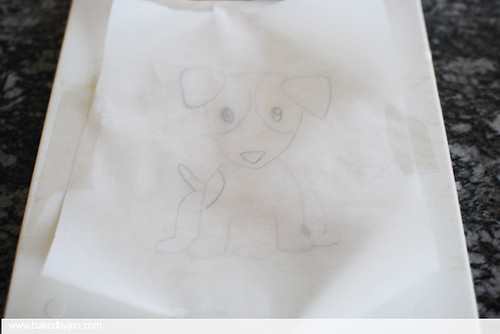
First, I traced a picture of my dog Patches that my brother created for me onto a piece of parchment paper and taped it onto my cutting board face down.

frozen buttercream transfer step 2
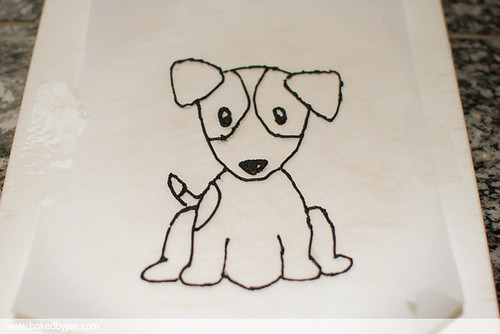
Then, I traced over the lines using the Wilton Ready To Use Icing Tube in black with a #2 tip.

frozen buttercream transfer step 3
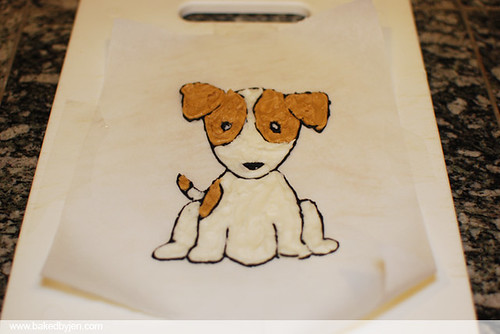
Next, I filled in the picture accordingly with my go to vanilla buttercream frosting using an angled spatula.

frozen buttercream transfer step 4
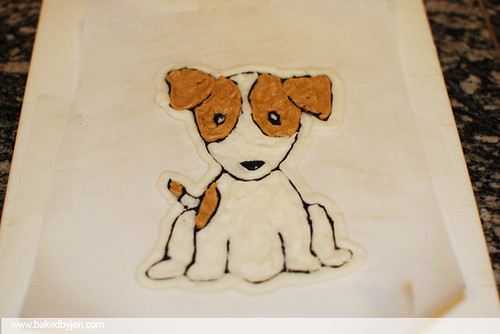
Then, I created an additional white border around the entire image to help make it pop once on the cake.

frozen buttercream transfer step 5
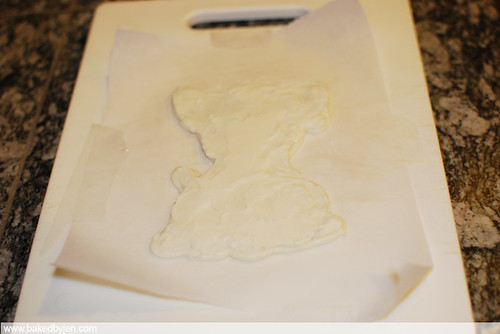
Last, I covered the entire image with frosting; pressing down slightly to remove any air pockets.  I froze the image overnight and the next morning, I placed it onto the cake and the parchment paper peeled right off.

Thursday, February 24, 2011

Nikon D5000 Cake

nikon cake front


It has been a little over a year since I made what I thought at the time was my first "show stopping" cake per my sister's request.  The cake requests are definitely getting more creative and complex.  However, I can't complain as I am definitely learning a lot along the way.

My cousin, a photography hobbyist, celebrated his birthday last week and as a gift to him, I made him a cake replica of his camera per his request.  Having a lot of images to go by helps a lot.  After looking at several images of the camera online, I realized it was similar to my own Nikon D60. So, I actually used that as a model and then piped on his camera model at the end.


nikon cake carved / crumbcoat


This was my first time carving without a template; so scary! I started with a 2 layer 8-inch square red velvet cake with vanilla buttercream frosting which I cut in half and then proceeded to carve. After sending a quick picture of it to my boyfriend, he commented that it was too small.  So, I added another layer to the top and to the side.  I also changed the jutting top piece into a trapezoid from a square the second time around.


nikon cake fondant fail


I used store bought fondant to cover the cake and it was a nightmare to work with that day.  I couldn't get it as pliable as I wanted/needed and my first attempt ended with way too wrinkles.  So, I ripped it all off and started over.  That resulted in losing all my sharp edges but nothing cake spackle couldn't fix.

I realize I don't take any pictures of the lens in the making!  It was made of store bought rice krispies treats I smashed together and covered in two layers of fondant to avoid the lumps and bumps.  Pearl luster dust mixed with vodka gave the perfect illusion of a glare for the lens.


nikon cake back 


nikon cake top 


My two personal favorite details on the cake was sneaking my dog Patches onto the back screen and the personalized camera strap.  I love the trim I was able to put onto the strap with my Wilton cutter/embosser wheel.  I learned that I need to work on my piping skills; it took me five attempts to just pipe the words Nikon and D5000 onto the cake correctly!

Thursday, February 17, 2011

Hot Wheels Theme Birthday

race car track cake

I had the pleasure of making this cake for a friend's nephew's Hot Wheels theme birthday last weekend.  As soon as she mentioned the theme to me, I knew I wanted to make a race track.  I decided not to cover the entire cake in fondant and I'm so glad that the paper towel method worked very well with my frosting this time around.

The cake was hand carved from an 8 inch square yellow cake using a template my brother created for me.  I filled, crumb coated, frosted, and decorated with vanilla buttercream frosting.  The only fondant I used were the red and black pieces.  The cars are from a Hot Wheels candle set I picked up from Party City.


Filled, stacked, carved.

Crumb coated.


Frosted.


Smoothed out.


In addition to the race car track cake, I made a dozen oreo cupcakes for the party.  I loved the oreo on the bottom concept from the oreo cheesecakes that I used it with the cupcakes.  The cupcakes were my go to white cake with chopped oreos and the frosting was my go to vanilla buttercream frosting with crushed oreos.

Monday, February 7, 2011

Superbowl Sweets


For our Superbowl party yesterday, I made these quick and easy Oreo cheesecakes from Martha Stewart's Cupcakes book for dessert.  They were a huge hit, especially with a whole Oreo serving as the bottom crust.  However, I realized that even though they were portable, these keep cold desserts were not suitable to just leave out with the rest of the food.  I had to leave them in the fridge and remember to bring them out later in the game when I assumed people were ready for dessert. 

In addition, I made maple bacon kettle corn for people to snack on throughout the game.  I have made kettle corn before but when I saw this one that took it to another level with the addition of bacon, I had to give it a try.  Not for the faint of heart as you use the leftover bacon grease to pop the popcorn!  Ingenious!


Maple Bacon Kettle Corn
slightly adapted from Brown Eyed Baker
Makes about 20 cups

4 slices bacon, cooked and grease reserved
1 tablespoon maple syrup
1/2 cup corn kernels for popping
1/4 cup cooking oil (use the reserved bacon grease and add extra vegetable/canola/olive oil to make ¼ cup)
3 tablespoons granulated sugar
1 teaspoon salt


Fry the bacon in a skillet until brown and crisp. Remove to a paper towel-lined plate to drain and cool. Once cool, chop into small pieces and toss with the maple syrup.


Measure out the reserved bacon grease into a measuring cup. If you don’t have a 1/4 cup, add vegetable, canola or olive oil to make 1/4 cup total.


Heat the stove to medium heat, put the cooking grease/oil in a large pan, and add 3 popcorn kernels.  Once you hear the kernels pop, that means the oil is ready.

Add the rest of the kernels, sprinkle with the sugar, and 3/4 teaspoon of salt, and cover the pan with a tight-fitting lid.


Use two pot holders to hold lid on the pan and shake the pan for 3 seconds, then return to the burner for 3 seconds. Continue to do this often throughout the popping process, alternating between lifting/shaking and leaving on the burner.


Once the popping has slowed down, remove the lid, and salt the popcorn with the remaining salt. Use a large spoon to stir the popcorn. Toss in the bacon and maple syrup mixture. Mix together and serve immediately.

Thursday, February 3, 2011

Chinese Almond Cookies


Happy Year of the Cat!  Tonight, we're having a potluck dinner at my cousin's to celebrate and I thought these Chinese Almond Cookies would be perfect to share with everyone.

I didn't have any blanched whole almonds, so a quick trick to removing the skin is placing them in a bowl and adding enough boiling water to cover them.  Let them sit for no more than a minute, drain, and rinse under cold water.  The skins should slip right off.

Here's to a healthy, happy, and prosperous year!

Chinese Almond Cookies
from Cooking for Engineers
Makes about 48 cookies


3 cups of all purpose flour
1 tsp baking soda
1/2 tsp salt
1/2 cup raw blanched slivered almonds, pulsed in food processor to a fine powder
1 1/2 cups (3 sticks) of butter, softened
1 cup sugar
1 egg
1 tsp almond extract
1 oz of water
48 whole almonds, blanched
1 egg beaten for egg wash


Preheat oven to 350 degrees.


Whisk together the flour, baking soda, salt, and ground almond.  Set aside.


In a standing mixer, cream the butter and sugar together.  Then, add the egg, almond extract, and water; beating after each addition until incorporated.


Add the dry mixture and mix until combined.


Using a tablespoon cookie scoop, scoop out 1 inch balls (roll into smooth balls, if preferred), and press whole almonds onto the top of the balls.  Refrigerate each cookie sheet for 15 minutes.


Brush each cookie with egg wash.  Bake for 18-20 minutes.  Cool on wire racks.  Store in an airtight container.


Related Posts with Thumbnails